예제1)
EmailSendBean 클래스를 이용해 메일 서버의 STMP 서비스를 사용하여 메일을 전송시킬 수 있도록 만들어 볼것이다.
- 메일 서버(Mail Server)란 메일을 송수신하는 서비스를 제공하는 컴퓨터를 의미한다.
- SMTP(Simple Messgae Transfer Protocol) 서비스로 메일을 보내고 POP3(Post Office Protocol 3) 서비스나 IMAP(Internet Message Access Protocol) 서비스로 메일을 받아 사용자에게 전달할 수 있다.
JavaMail 기능을 구현하기 위해서는 spring-context-support 라이브러리와 javax.mail 라이브러리가 프로젝트에 빌드되도록 처리해주어야 한다.
메이븐을 이용해 pom.xml을 수정해주자
...
<!-- https://mvnrepository.com/artifact/org.springframework/spring-context-support -->
<!-- => Spring Context의 확장 기능을 제공하는 라이브러리 -->
<dependency>
	<groupId>org.springframework</groupId>
	<artifactId>spring-context-support</artifactId>
	<version>${org.springframework-version}</version><!-- spirng 프레임워크와 동일한 버전이어야 함 -->
</dependency>

<!-- https://mvnrepository.com/artifact/com.sun.mail/javax.mail -->
<!-- => Java Mail 기능을 제공하는 라이브러리 -->
<dependency>
    <groupId>com.sun.mail</groupId>
    <artifactId>javax.mail</artifactId>
    <version>1.6.2</version>
</dependency>
...
클래스에서 사용할 객체 및 메소드 정리
- JavaMailSender 객체 : SMTP 서비스를 제공하는 서버의 정보를 저장하기 위한 객체
- JavaMailSender.createMimeMessage() : MimeMessage 객체를 생성하여 반환하는 메소드
- JavaMailSender.send(MimeMessage message) : SMTP 서비스를 사용하여 메일을 전송하는 메소드
- MimeMessage 객체 : 메일 전송 관련 정보를 저장하기 위한 객체
- MimeMessage.setSubject(String subjet) : MimeMessage 객체의 메일 제목을 변경하는 메소드
- MimeMessage.setText(String content) : MimeMessage 객체의 메일 내용(텍스트 메세지)을 변경하는 메소드
- MimeMessage.setContent(Object o, Spring type) : MimeMessage 객체의 메일 내용(일반문서)을 변하는 메소드
- → type 매개변수에 메일로 전달할 문서의 형식(MimeType)을 전달하여 저장
- message.setRecipient(RecipientType type, Address address) : MimeMessage 객체의 메일을 받는 사람의 이메일 주소 관련 정보를 변경하는 메소드
- → RecipientType : 메일 수신 사용자를 구분하기 위한 상수값을 전달한다.
- → Address : 이메일 주소가 저장된 Address 객체를 전달한다.
- message.setRecipient(RecipientType type, Address[] address) : MimeMessage 객체의 메일을 받는 사람들의 이메일 주소 관련 정보를 변경하는 메소드 - 다수의 사람에게 메일을 전달한다.
- InternetAddress 객체 : 이메일 주소를 저장하기 위한 객체
EmailSendBean
package xyz.itwill07.aop;

import javax.mail.internet.InternetAddress;
import javax.mail.internet.MimeMessage;
import javax.mail.internet.MimeMessage.RecipientType;

import org.springframework.mail.javamail.JavaMailSender;

import lombok.Setter;

//메일 전송 기능을 제공하기 위한 클래스 - 메일 서버의 SMTP 서비스를 사용하여 메일 전송
public class EmailSendBean {
	//JavaMailSender 객체를 저장하기 위한 필드 선언
	// - JavaMailSender 객체 : SMTP 서비스를 제공하는 서버의 정보를 저장하기 위한 객체
	@Setter
	private JavaMailSender javaMailSender;

	//메일을 전송하는 메소드
	// => 메일을 받는 사람의 이메일 주소, 제목, 내용을 매개변수로 전달받아 저장
	// => 메일을 받는 사람의 이메일 주소를 반환
	public String sendEmail(String email, String subject, String content) throws Exception {
		//MimeMessage 객체를 생성하여 반환
		MimeMessage message=javaMailSender.createMimeMessage();
		//MimeMessage 객체의 메일 제목을 변경
		message.setSubject(subject);
		//MimeMessage 객체의 메일 내용을 변경
		//message.setText(content);

		//MimeMessage 객체의 메일 내용을 변경 - 메일로 전달할 문서의 형식을 전달하여 저장
		message.setContent(content, "text/html; charset=utf-8");//HTML 문서로 전달(HTML 태그로 동작되어 전달)

		//MimeMessage 객체에서 메일을 받는 사람의 이메일 관련 정보를 변경
		message.setRecipient(RecipientType.TO, new InternetAddress(email));

		//SMTP 서비스를 사용하여 메일을 전송
		javaMailSender.send(message);

		return email;
	}
}
* Google의 앱 비밀번호를 제공받는 방법
Google 계정 관리 ?>> 보안 >> 2 단계 보안 인증 >> 앱 비밀번호 >> 비밀번호 생성

07-3_email.xml
<?xml version="1.0" encoding="UTF-8"?>
<beans xmlns="http://www.springframework.org/schema/beans"
	xmlns:xsi="http://www.w3.org/2001/XMLSchema-instance"
	xmlns:aop="http://www.springframework.org/schema/aop"
	xsi:schemaLocation="http://www.springframework.org/schema/beans http://www.springframework.org/schema/beans/spring-beans.xsd
		http://www.springframework.org/schema/aop http://www.springframework.org/schema/aop/spring-aop.xsd">

	<!-- JavaMailSender 인터페이스를 상속받은 JavaMailSenderImpl 클래스를 Spring Bean으로 등록 -->
	<!-- => SMTP 서비스를 제공하는 메일 서버의 정보를 JavaMailSenderImpl 객체 필드에 저장되도록 값 주입  -->
	<bean class="org.springframework.mail.javamail.JavaMailSenderImpl" id="javaMailSender">
		<!-- host 필드 : SMTP 서비스를 제공하는 메일 서버의 이름 저장 -->
		<property name="host" value="smtp.gmail.com"/>
		<!-- port 필드 : SMTP 서비스를 제공하는 메일 서버의 PORT 번호 저장 -->
		<property name="port" value="587"/>
		<!-- username 필드 : SMTP 서비스를 제공하는 메일 서버의 접속 사용자 이름(아이디)을 저장 -->
		<property name="username" value="아이디"/>
		<!-- password 필드 : SMTP 서비스를 제공하는 메일 서버의 접속 사용자 비밀번호를 저장 -->
		<!-- => 사용자 비밀번호 대신 앱 비밀번호를 제공받아 사용하면 된다. -->
		<property name="password" value="앱비밀번호"/>

		<property name="javaMailProperties">
			<props>
				<prop key="mail.smtp.ssl.trust">smtp.gmail.com</prop>
				<prop key="mail.smtp.starttls.enable">true</prop>
				<prop key="mail.smtp.auth">true</prop>
			</props>
		</property>
	</bean>


	<!-- 핵심관심모듈의 클래스(EmailSendBean 클래스)를 Spring Bean으로 등록 -->
	<!-- => EmailSendBean 클래스의 javaMailSender 필드에 JavaMailSender 객체(Spring Bean)가 저장되도록 의존성 주입 -->
	<bean class="xyz.itwill07.aop.EmailSendBean" id="emailSendBean">
		<property name="javaMailSender" ref="javaMailSender"/>
	</bean>
</beans>
package xyz.itwill07.aop;

import org.springframework.context.ApplicationContext;
import org.springframework.context.support.ClassPathXmlApplicationContext;

public class EmailSendApp {
	public static void main(String[] args) throws Exception {
		ApplicationContext context=new ClassPathXmlApplicationContext("07-3_email.xml");
		EmailSendBean bean=context.getBean("emailSendBean", EmailSendBean.class);
		System.out.println("==========================================================");
		bean.sendEmail("아이디@naver.com", "메일 전송 테스트"
			, "<h1>JavaMail 기능을 사용하여 전달된 이메일입니다.<h1>");
		System.out.println("==========================================================");
		((ClassPathXmlApplicationContext)context).close();
	}
}

메일이 잘 전송됐는지 확인하기 위해 Advice 클래스를 이용할 것이다
EmailSendAdvice
package xyz.itwill07.aop;

import org.aspectj.lang.JoinPoint;

import lombok.extern.slf4j.Slf4j;

//횡단관심모듈 - Advice 클래스
@Slf4j
public class EmailSendAdvice {
	//메일을 전송하기 전에 삽입되어 실행될 명령이 작성된 메소드 - Before Advice Method
	// => 받는 사람의 이메일 주소와 제목을 제공받아 로그로 기록
	public void acessLog(JoinPoint joinPoint) {
		//타겟메소드의 매개변수에서 받는 사람의 이메일 주소를 제공받아 저장
		String email=(String)joinPoint.getArgs()[0];
		//타겟메소드의 매개변수에서 메일 제목을 제공받아 저장
		String subject=(String)joinPoint.getArgs()[1];
		log.info(email+"님에게 <"+subject+"> 제목의 이메일을 전송합니다.");
	}
}
07-3_email.xml
	<!-- 횡단관심모듈의 클래스(EmailSendAdvice 클래스)를 Spring Bean으로 등록 -->
	<bean class="xyz.itwill07.aop.EmailSendAdvice" id="emailSendAdvice"/>

	<aop:config>
		<aop:pointcut expression="execution(* sendEmail(..))" id="sendEmailPointcut"/>
		<aop:aspect ref="emailSendAdvice">
			<aop:before method="accessLog" pointcut-ref="sendEmailPointcut"/>
			<aop:after-returning method="successLog" pointcut-ref="sendEmailPointcut" returning="email"/>
			<aop:after-throwing method="errorLog" pointcut-ref="sendEmailPointcut" throwing="exception"/>
		</aop:aspect>
	</aop:config>
log4j.xml
<logger name="xyz.itwill07.aop">
	<level value="info"/>
</logger>

예제2)
메소드를 호출해 원하는 결과가 나올 때 까지 걸리는 시간을 계산할 수 있도록 만들어보자
메소드 및 용어 정리
- System.currentTimeMillis() : 시스템의 현재 날짜와 시간에 대한 타임스탬프를 반환하는 메소드
- 타임스탬프(TimeStamp) : 날짜와 시간에 대한 연산을 목적으로 날짜와 시간을 정수값으로 반환한 값
ExceptionTimeBean
package xyz.itwill07.aop;
public class ExecutionTimeBean {
public void one() {
long startTime=System.currentTimeMillis();//시스템의 현재 날짜와 시간에 대한 타임스템프를 반환
long count=0;
for(long i=1;i<=10000000000L;i++) {
count++;
}
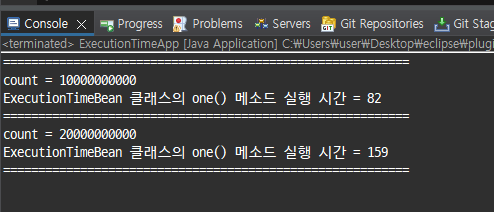
System.out.println("count = "+count);
long endTime=System.currentTimeMillis();
System.out.println("ExecutionTimeBean 클래스의 one() 메소드 실행 시간 = "+(endTime-startTime)+"ms");
}
public void two() {
long startTime=System.currentTimeMillis();
long count=0;
for(long i=1;i<=20000000000L;i++) {
count++;
}
System.out.println("count = "+count);
long endTime=System.currentTimeMillis();
System.out.println("ExecutionTimeBean 클래스의 one() 메소드 실행 시간 = "+(endTime-startTime)+"ms");
}
}
07-4_timer.xml
<?xml version="1.0" encoding="UTF-8"?>
<beans xmlns="http://www.springframework.org/schema/beans"
	xmlns:xsi="http://www.w3.org/2001/XMLSchema-instance"
	xmlns:aop="http://www.springframework.org/schema/aop"
	xsi:schemaLocation="http://www.springframework.org/schema/beans http://www.springframework.org/schema/beans/spring-beans.xsd
		http://www.springframework.org/schema/aop http://www.springframework.org/schema/aop/spring-aop.xsd">

	<bean class="xyz.itwill07.aop.ExecutionTimeBean" id="executionTimeBean"/>
</beans>
ExcutionTimeApp
package xyz.itwill07.aop;

import org.springframework.context.ApplicationContext;
import org.springframework.context.support.ClassPathXmlApplicationContext;

public class ExecutionTimeApp {
	public static void main(String[] args) {
		ApplicationContext context=new ClassPathXmlApplicationContext("07-4_timer.xml");
		ExecutionTimeBean bean=context.getBean("executionTimeBean", ExecutionTimeBean.class);
		System.out.println("==========================================================");
		bean.one();
		System.out.println("==========================================================");
		bean.two();
		System.out.println("==========================================================");
		((ClassPathXmlApplicationContext)context).close();
	}
}
이번엔 핵심관심코드와 횡단관심코드를 분리해서 작성해보자
ExecutionTimeBean
package xyz.itwill07.aop;

public class ExecutionTimeBean {
	public void one() {
		//long startTime=System.currentTimeMillis();//시스템의 현재 날짜와 시간에 대한 타임스템프를 반환

		long count=0;
		for(long i=1;i<=10000000000L;i++) {
			count++;
		}
		System.out.println("count = "+count);

		//long endTime=System.currentTimeMillis();
		//System.out.println("ExecutionTimeBean 클래스의 one() 메소드 실행 시간 = "+(endTime-startTime)+"ms");
	}

	public void two() {
		//long startTime=System.currentTimeMillis();

		long count=0;
		for(long i=1;i<=20000000000L;i++) {
			count++;
		}
		System.out.println("count = "+count);

		//long endTime=System.currentTimeMillis();
		//System.out.println("ExecutionTimeBean 클래스의 one() 메소드 실행 시간 = "+(endTime-startTime)+"ms");
	}

}
ExecutionTimeAdvice
package xyz.itwill07.aop;

import org.aspectj.lang.ProceedingJoinPoint;

public class ExecutionTimeAdvice {
	//타겟메소드의 명령이 실행되는 처리시간을 계산하여 기록하기 위한 메소드 - Around Advice Method
	public Object timeWatchLog(ProceedingJoinPoint joinPoint) throws Throwable {
		//타겟메소드의 명령 실행 전에 동작될 명령을 작성
		long startTime=System.currentTimeMillis();

		//타겟메소드의 명령 실행 - 타겟메소드 호출
		Object returnValue=joinPoint.proceed();

		//타겟메소드의 명령 실행 후에 동작될 명령 작성
		long endTime=System.currentTimeMillis();

		String className=joinPoint.getTarget().getClass().getSimpleName();
		String methodName=joinPoint.getSignature().getName();

		System.out.println(className+"클래스의 "+ methodName +"() 메소드 실행 시간 = "
				+(endTime-startTime)+"ms");

		return returnValue;
	}
}
07-4_timer.xml
	<bean class="xyz.itwill07.aop.ExecutionTimeAdvice" id="executionTimeAdvice"/>

	<aop:config>
		<aop:aspect ref="executionTimeAdvice">
			<aop:around method="timeWatchLog" pointcut="execution(* *(..))"/>
		</aop:aspect>
	</aop:config>
main 메소드 실행

Spring 프레임워크에서 제공해주는 StopWatch 객체를 이용해 Advice 클래스를 작성해보자
StopWatch 객체는 시간을 측정하기 위한 기능을 제공한다.
ExecutionTimeAdvice
package xyz.itwill07.aop;

import org.aspectj.lang.ProceedingJoinPoint;
import org.springframework.util.StopWatch;

public class ExecutionTimeAdvice {
	public Object timeWatchLog(ProceedingJoinPoint joinPoint) throws Throwable {
		//타겟메소드의 명령 실행 전에 동작될 명령을 작성
		StopWatch stopWatch=new StopWatch();//StopWatch 객체 : 시간을 측정하기 위한 기능 제공

		//시간 측정 시작
		stopWatch.start();

		//타겟메소드의 명령 실행 - 타겟메소드 호출
		Object returnValue=joinPoint.proceed();

		//시간 측정 종료
		stopWatch.stop();

		String className=joinPoint.getTarget().getClass().getSimpleName();
		String methodName=joinPoint.getSignature().getName();

		//getTotalTimeMillis() : 시간 측정 결과를 ms 단위로 반환하는 메소드
		System.out.println(className+"클래스의 "+ methodName +"() 메소드 실행 시간 = "
				+stopWatch.getTotalTimeMillis()+"ms");

		return returnValue;
	}
}
메소드마다 중복되는 횡단관심코드를 Advice 클래스로 만들어 필요할 때마다 환경설정을 통해 실행될 수 있도록 만들어주면 중복성을 최소화할 수 있다는 점이 aop를 사용하는 가장 큰 이유이다.
'학원 > 복기' 카테고리의 다른 글
| [Spring] 데이터베이스 연동 (0) | 2023.08.06 |
|---|---|
| [Spring] AOP 어노테이션 (0) | 2023.08.06 |
| [Spring] AOP(Aspect Oriented Programming) (0) | 2023.08.03 |
| [Spring] Lombok 라이브러리 (0) | 2023.07.30 |
| [Spring] Annotation 이용한 의존성 주입 (수정..) (0) | 2023.07.30 |


