스프링 빈(Spring Bean)
스프링 빈(Spring Bean)은 Spring 프레임워크에서 IoC 컨테이너에 의해 생성, 관리되는 객체를 말한다. Spring 컨테이너에 등록된 빈은 일반적으로 XML, 어노테이션 또는 자바 설정 파일에 정의되며, 애플리케이션의 다양한 컴포넌트들을 대표한다.
먼저 스프링빈을 XML을 이용해 정의해보자
스프링빈을 사용하는 방법을 예제를 통해 알아보자
[CreateBean] 클래스 선언
package xyz.itwill04.bean;

public class CreateBean {
	public CreateBean() {
		System.out.println("### CreateBean 클래스의 기본 생성자 호출 ###");
	}

	public void display() {
		System.out.println("*** CreateBean 클래스의 display() 메소드 호출 ***");
	}
}
Spring 프레임워크에서는 BeanFactory 객체 또는 ApplicationContext 객체로 스프링 컨테이너(Spring Container) 기능을 제공한다.
스프링 컨테이너는 환경설정파일(Spring Bean Configuration File - XML)을 제공받아 Spring Bean(객체)을 관리한다.
BeanFactory 객체로 스프링 컨테이너 기능을 제공받을 때와 ApplicationContext 객체로 스프링 컨테이너 기능을 제공받을때는 차이점이 존재한다.
각각의 예시를 보도록 하겠다.
1.BeanFactory 객체를 생성하여 스프링 컨테이너로 사용하는 방법
bean 엘리먼트
bean은 스프링 컨테이너에서 Spring Bean 관련 정보를 제공하기 위한 엘리먼트이다.
- class 속성 : Spring Bean으로 등록되어 사용될 클래스를 속성값으로 설정한다. (필수 속성)
- class 속성값은 이클립스의 자동 완성 기능을 사용하여 작성이 가능하다.
- id 속성 : Spring Bean을 구분하기 위한 식별자(BeanName 또는 beanId)를 속성값으로 설정한다.
- id 속성 대신 name 속성을 사용하여 식별자 설정이 가능하다.
- id 속성값은 클래스 이름(인터페이스 이름)을 이용하여 설정하는 것을 권장한다.
- id 속성값은 class 속성이 먼저 작성된 경우 이클립스의 자동 완성 기능을 사용하여 작성할 수 있다.
먼저 bean 엘리먼트 선언해주자
[04-1_beanCreate.xml]
<?xml version="1.0" encoding="UTF-8"?>
<beans xmlns="http://www.springframework.org/schema/beans"
	xmlns:xsi="http://www.w3.org/2001/XMLSchema-instance"
	xsi:schemaLocation="http://www.springframework.org/schema/beans http://www.springframework.org/schema/beans/spring-beans.xsd">

	<!-- bean 엘리먼트  -->
	<bean class="xyz.itwill04.bean.CreateBean" id="createBean"/>
</beans>
하나의 Spring Bean Configuration File을 사용하여 Spring Bean을 설정할 경우 가독성 및 유지보수의 효율성이 떨어지기 때문에
Spring Bean Configuration File을 여러개 작성하여 사용하는 것을 권장한다.
import 엘리먼트를 이용하면 다른 Spring Bean Configuration File의 정보를 제공받아 포함할 수 있다.
(resource 속성에 포함될 Spring Bean Configuration File의 경로를 속성값으로 설정하면 된다.)
<import resource="03_message.xml"/>
BeanFactory 인터페이스를 상속받은 자식클래스로 BeanFactory 객체를 생성한다.
→ BeanFactory 객체를 생성할 때 Spring Bean Configuration File을 제공받아 스프링 컨테이너를 생성한다.
컨테이너 생성 = 스프링 컨테이너 초기화 작업이다.
→ 매개변수에는 Spring Bean Configuration File 경로를 제공받아 Resource 객체로 생성하여 전달한다.
→ BeanFactory 객체는 Spring Bean Configuration File에 등록된 클래스로 미리 객체를 생성하지 않고 Spring Bean을 제공받기 위해 요청시 객체를 생성하여 제공한다.
BeanFactory.getBean(String beanName)
: 매개변수에 Spring Bean을 구분하기 위한 식별자(beanName)을 전달하여 스프링 컨테이너로부터 Spring Bean(객체)를 생성하여 반환하는 메소드
→ Object 타입의 객체를 반환하므로 반드시 명시적 객체 형변환을 사용해야 한다.
→ 매개변수로 전달받은 식별자(beanName)의 Spring Bean이 없는 경우 NoSuchBeanDefinitionException이 발생한다.
[CreateBeanApp] 클래스
package xyz.itwill04.bean;

import java.io.File;
import java.io.IOException;
import java.io.InputStream;
import java.net.URI;
import java.net.URL;

import org.springframework.beans.factory.BeanFactory;
import org.springframework.beans.factory.xml.XmlBeanFactory;
import org.springframework.core.io.FileSystemResource;
import org.springframework.core.io.Resource;

@SuppressWarnings("deprecation")
public class CreateBeanApp {
	public static void main(String[] args) {
		System.out.println("1.BeanFactory 객체를 생성하여 스프링 컨테이너로 사용하는 방법");
		System.out.println("================ Spring Container 초기화 전 ================");
		//BeanFactory 인터페이스를 상속받은 자식클래스로 객체를 생성
		// => BeanFactory 객체를 생성할 때 Spring Bean Configuration File을 제공받아 스프링 컨테이너를 생성
		BeanFactory factory=new XmlBeanFactory
				(new FileSystemResource("src/main/resources/04-1_beanCreate.xml"));
		System.out.println("================ Spring Container 초기화 후 ================");
		//Spring Bean(객체)를 생성하여 반환
		CreateBean bean1=(CreateBean)factory.getBean("createBean");
		bean1.display();
		System.out.println("============================================================");

	}
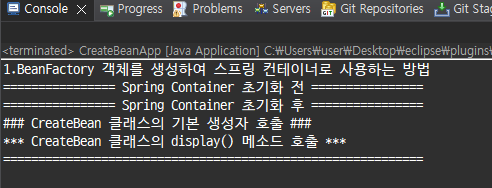
}
실제로 현재는 BeanFactory 객체보다는 pplicationContext 객체를 생성하여 스프링 컨테이너로 사용하는 방법을 더 많이 사용한다.
2) ApplicationContext 객체를 생성하여 스프링 컨테이너로 사용하는 방법
먼저 ApplicationContext 인터페이스를 상속받은 자식클래스로 ApplicationContext 객체를 생성한다.
→ ApplicationContext 객체를 생성할 때 Spring Bean Configuration File을 제공받아 스프링 컨테이너를 생성한다. - 스프링 컨테이너 초기화 작업
→ 클래스가 참조 가능한 폴더(ClassPath)에 저장된 Spring Bean Configuration File을 제공받아 사용할 수 있다.
ApplicationContext 객체는 Spring Bean Configuration File에 등록된 클래스로 미리 객체를 생성하여 Spring Bean 요청시 미리 생성된 객체를 제공한다.
ApplicationContext .getBean(String beanName)
: 매개변수로 Spring Bean을 구분하기 위한 식별자(beanName)을 전달받아 스프링 컨테이너로부터 Spring Bean(객체)를 반환하는 메소드
→ Object 타입의 객체를 반환하므로 반드시 명시적 객체 형변환을 사용해야 한다.
→ 매개변수로 전달받은 식별자(beanName)의 Spring Bean이 없는 경우 NoSuchBeanDefinitionException이 발생한다.
ClassPathXmlApplicationContext.close() : ApplicationContext 객체를 제거하는 메소드
→ 스프링 컨테이너가 소멸되기 전에 스프링 컨테이너에 의해 관리되는 모든 객체
package xyz.itwill04.bean;

import org.springframework.beans.factory.BeanFactory;
import org.springframework.beans.factory.xml.XmlBeanFactory;
import org.springframework.context.ApplicationContext;
import org.springframework.context.support.ClassPathXmlApplicationContext;
import org.springframework.core.io.FileSystemResource;

@SuppressWarnings("deprecation")
public class CreateBeanApp {
	public static void main(String[] args) {
		System.out.println("2.ApplicationContext 객체를 생성하여 스프링 컨테이너로 사용하는 방법");
		System.out.println("================ Spring Container 초기화 전 ================");
		BeanFactory factory=new XmlBeanFactory
				(new FileSystemResource("src/main/resources/04-1_beanCreate.xml"));
		ApplicationContext context=new ClassPathXmlApplicationContext("04-1_beanCreate.xml");
		System.out.println("================ Spring Container 초기화 후 ================");
		CreateBean bean2=(CreateBean)factory.getBean("createBean");
		bean2.display();
        	//ApplicationContext 객체를 제거
		((ClassPathXmlApplicationContext)context).close();
	}
}
이처럼 스프링 컨테이너가 객체를 찾아서 제공하는 것을 DL 이라고 한다.
DL(Dpendency Lookup) 은 스프링 컨테이너가 관리하는 객체(Spring Bean)를 검색하여 제공하는 기능을 뜻한다.
예제를 통해 bean 엘리먼트의 속성에 대해 알아보자
package xyz.itwill04.bean;

public class InitDestroyMethodBean {
	public InitDestroyMethodBean() {
		System.out.println("### InitDestroyMethodBean 클래스의 기본 생성자 호출 ###");
	}

	public void init() {
		System.out.println("*** InitDestroyMethodBean 클래스의 init() 메소드 호출 ***");
	}

	public void destroy() {
		System.out.println("*** InitDestroyMethodBean 클래스의 destroy() 메소드 호출 ***");
	}

	public void display() {
		System.out.println("*** InitDestroyMethodBean 클래스의 display() 메소드 호출 ***");
	}
}
[04-2_beanAttribute.xml]
<?xml version="1.0" encoding="UTF-8"?>
<beans xmlns="http://www.springframework.org/schema/beans"
	xmlns:xsi="http://www.w3.org/2001/XMLSchema-instance"
	xsi:schemaLocation="http://www.springframework.org/schema/beans http://www.springframework.org/schema/beans/spring-beans.xsd">

	<bean class="xyz.itwill04.bean.InitDestroyMethodBean" id="initDestroyMethodBean"/>
</beans>
ApplicationContext.getBean(String beanName)
: 스프링 컨테이너로부터 매개변수로 전달받은 beanName의 Spring Bean를 검색하여 반환하는 메소드
→ Object 타입의 객체를 반환하므로 반드시 명시적 객체 형변환을 사용해야 한다.
[BeanAttributeApp]
package xyz.itwill04.bean;

import org.springframework.context.ApplicationContext;
import org.springframework.context.support.ClassPathXmlApplicationContext;

public class BeanAttributeApp {
	public static void main(String[] args) {
		System.out.println("================ Spring Container 초기화 전 ================");
		ApplicationContext context=new ClassPathXmlApplicationContext("04-2_beanAttribute.xml");
		System.out.println("================ Spring Container 초기화 후 ================");
		InitDestroyMethodBean bean=(InitDestroyMethodBean)context.getBean("initDestroyMethodBean");

		bean.init();
		bean.display();
		bean.destroy();
		System.out.println("============================================================");
		((ClassPathXmlApplicationContext)context).close();
		System.out.println("============================================================");
	}
}
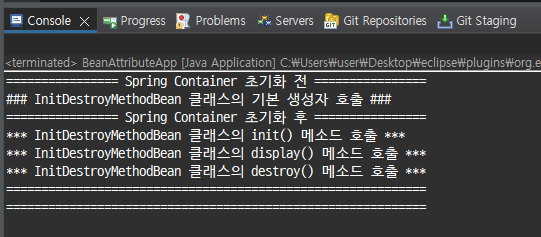
ApplicationContext.getBean(String beanName, Class<T> clazz)
: 스프링 컨테이너로부터 매개변수로 전달받은 beanName의 Spring Bean(객체)를 Class 객체로 객체 형변환하여 반환하는 메소드
이 메소드를 사용하면 형변환을 따로 해주지 않아도 되어서 편리하다.
//InitDestroyMethodBean bean=(InitDestroyMethodBean)context.getBean("initDestroyMethodBean");
InitDestroyMethodBean bean=context.getBean("initDestroyMethodBean", InitDestroyMethodBean.class);
init-method 속성 & dstroy-method 속성
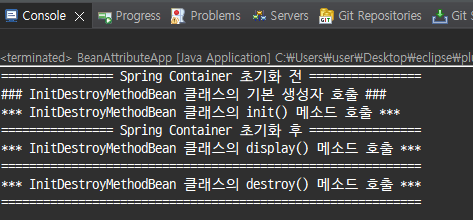
bean 엘리먼트를 이용하면 메소드를 객체가 생성된 후 자동으로 호출되도록 설정이 가능하다.
bean.init();//초기화 메소드bean 엘리먼트를 이용하면 메소드를 객체 소멸 전 자동으로 호출되도록 설정 가능하다.
bean.destroy();//마무리 메소드
init-method 속성
: 스프링 컨테이너에 의해 객체(Spring Bean)가 생성된 자동으로 한번만 호출되어 객체 초기화 작업을 실행하기 위한 메소드의 이름을 속성값으로 설정한다.
destroy-method 속성 :
스프링 컨테이너에 의해 객체(Spring Bean)가 소멸되기 전에 자동으로 한번만 호출되어 객체 마무리 작업을 실행하기 위한 메소드의 이름을 속성값으로 설정한다.
[04-2_beanAttribute.xml]
<bean class="xyz.itwill04.bean.InitDestroyMethodBean" id="initDestroyMethodBean"
	init-method="init" destroy-method="destroy"/>
package xyz.itwill04.bean;

import org.springframework.context.ApplicationContext;
import org.springframework.context.support.ClassPathXmlApplicationContext;

public class BeanAttributeApp {
	public static void main(String[] args) {
		System.out.println("================ Spring Container 초기화 전 ================");
		ApplicationContext context=new ClassPathXmlApplicationContext("04-2_beanAttribute.xml");
		System.out.println("================ Spring Container 초기화 후 ================");
		//InitDestroyMethodBean bean=(InitDestroyMethodBean)context.getBean("initDestroyMethodBean");

		//ApplicationContext.getBean(String beanName, Class<T> clazz)
		InitDestroyMethodBean bean=context.getBean("initDestroyMethodBean", InitDestroyMethodBean.class);
		//bean 엘리먼트를 이용하면 메소드를 객체가 생성된 후 자동으로 호출되도록 설정 가능
		//bean.init();//초기화 메소드
		bean.display();
		//bean 엘리먼트를 이용하면 메소드를 객체 소멸 전 자동으로 호출되도록 설정 가능
		//bean.destroy();//마무리 메소드
		System.out.println("============================================================");
		((ClassPathXmlApplicationContext)context).close();
		System.out.println("============================================================");
	}
}
lazy-init 속성
예제)
[LazyInitBean]
package xyz.itwill04.bean;

public class LazyInitBean {
	public LazyInitBean() {
		System.out.println("### LazyInitBean 클래스의 기본 생성자 호출 ###");
	}
}
bean 엘리먼트로 등록
[04-2_beanAttribute.xml]
<bean class="xyz.itwill04.bean.LazyInitBean" id="lazyInitBean"/>
main에서 실행

이처럼 사용하지 않는 경우에도 객체로 미리 생성되기 때문에, 메모리 효율에 좋지 않다.
객체로 미리 생성하고 싶지 않은 경우에 lazy-init 속성을 사용하면 된다.
lazy-init 속성 : false(기본값) 또는 true 중 하나를 속성값으로 설정한다.
→ false(기본) : 스프링 컨테이너가 초기화될 때 객체(Spring Bean)를 미리 생성한다.
→ true : 스프링 컨테이너가 초기화될 때 객체(Spring Bean)를 미리 생성하지 않고 getBean() 메소드를 호출할 때 객체를 생성하여 제공한다.
[04-2_beanAttribute.xml]
<bean class="xyz.itwill04.bean.LazyInitBean" id="lazyInitBean" lazy-init="true"/>
factory-method 속성
싱글톤 디자인 패턴을 적용한 클래스를 작성해보자 - 싱글톤 클래스
→ 프로그램에 필요한 객체를 하나만 제공하기 위한 목적의 클래스를 작성할 때 사용하는 디자인 패턴
[FactoryMethodBean] 클래스
package xyz.itwill04.bean;

//싱글톤 디자인 패턴을 적용하여 작성된 클래스 - 싱글톤 클래스(Sinleton Class)
public class FactoryMethodBean {
	private static FactoryMethodBean _bean;

	private FactoryMethodBean() {
		System.out.println("### FactoryMethodBean 클래스의 기본 생성자 호출 ###");
	}

	static {
		_bean=new FactoryMethodBean();
	}

	public static FactoryMethodBean getFactoryMethodBean() {
		return _bean;
	}
}
[04-2_beanAttribute.xml]
<!-- 객체 생성 자체가 목적이면 id 생략 -->
<bean class="xyz.itwill04.bean.FactoryMethodBean"/>
main에서 실행
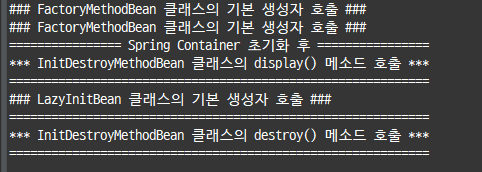
이처럼 객체가 두 번 생성되는 것을 확인할 수 있다.
Spring 컨테이너는 Spring Bean Configuration File에 등록된 모든 클래스를 리플렉션 기술을 사용하여 미리 객체(Spring Bean)로 생성한다.
리플렉션 기술을 사용하면 접근제한자에 상관없이 필드 또는 메소드 사용이 가능하다.
따라서 생성자가 은닉화 선언되어 있어도 스프링 컨테이너를 클래스의 생성자를 이용하여 객체를 생성할 수 있다.
문제점) Spring Bean Configuration File에 등록된 싱글톤 클래스는 해당 클래스를 읽어 메모리에 저장하여 Class 객체로 생성한 후 정적 영역의 명령을 실행하여 객체를 생성하고 스프링 컨테이너의 리플렉션에 의해 객체를 다시 생성한다. 따라서 싱글톤 클래스는 2개의 객체가 생성된다는 문제점이 발생한다.
이런 문제점을 해결하기 위해 factory-method 속성을 사용하면 싱글톤 클래스도 1개의 객체를 생성한다.
factory-method 속성 : 싱글톤 클래스에서 객체를 반환하는 메소드의 이름을 속성값으로 설정한다.
→ 스프링 컨테이너의 리플렉션을 이용하여 객체를 생성하지 않고 정적영역에서 생성된 객체를 사용해서 스프링빈으로 이용
<bean class="xyz.itwill04.bean.FactoryMethodBean" factory-method="getFactoryMethodBean"/>
main에서 실행
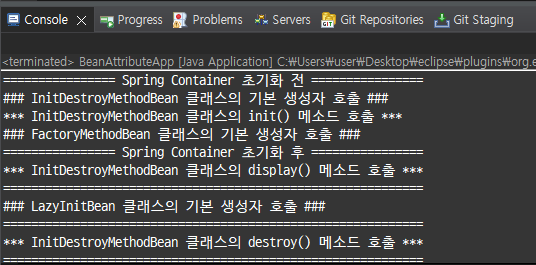
depends-on 속성
클래스 선언
package xyz.itwill04.bean;

public class DependenceOnOneBean {
	public DependenceOnOneBean() {
		System.out.println("### DependenceOnOneBean 클래스의 기본 생성자 호출 ###");
	}
}

public class DependenceOnTwoBean {
	public DependenceOnTwoBean() {
		System.out.println("### DependenceOnTwoBean 클래스의 기본 생성자 호출 ###");
	}
}
bean 엘리먼트 생성
<bean class="xyz.itwill04.bean.DependenceOnOneBean"/>
<bean class="xyz.itwill04.bean.DependenceOnTwoBean"/>
스프링 컨테이너는 bean 엘리먼트의 선언 순서대로 클래스를 읽어 객체로 생성한다.
객체 생성 순서를 바꾸기 위해서는 depends-on 속성을 사용하면 된다.
depends-on 속성 : Spring Bean을 구분하기 위한 식별자(beanName)를 속성값으로 설정한다.
→ bean 엘리먼트에 등록된 클래스로 객체를 생성하기 전에 depends-on 속성값으로 설정된 beanName의 Spring Bean을 먼저 생성한다.
→ Spring Bean(객체)의 초기화 작업에 필요한 객체를 제공받기 위해 먼저 생성할 경우 사용한다.
<bean class="xyz.itwill04.bean.DependenceOnOneBean" depends-on="dependenceOnTwoBean"/>
<bean class="xyz.itwill04.bean.DependenceOnTwoBean" id="dependenceOnTwoBean"/>
scope 속성
클래스 선언
package xyz.itwill04.bean;

public class ScopeBean {
	public ScopeBean() {
		System.out.println("### ScopeBean 클래스의 기본 생성자 호출 ###");
	}
}
scope 속성: singleton(기본값), prototype, request, session 중 하나를 속성값으로 설정한다.
- singleton 또는 prototype : 객체(Spring Bean)의 생성 갯수를 설정하는 속성값
- singleton 속성값 : 스프링 컨테이너가 bean 엘리먼트로 등록된 클래스로 객체를 하나만 생성해서 제공한다.
- prototype 속성값 : 스프링 컨테이너가 bean 엘리먼트로 등록된 클래스로 객체를 여러개 생성해서 제공한다.
- scope 속성값을 [prototpye]으로 설정한 경우 lazy-init 속성값을 [true]로 설정한 것과 동일하게 동작된다.
- → 스프링 컨테이너가 초기화될 때 객체를 생성하는 것이 아니라 getBean() 메소드를 호출할 때 객체를 생성한다.
- request 또는 sessinon : 객체의 사용범위를 설정하는 속성값 - 웹프로그램 작성시에만 사용한다. (일반적인 프로그램에서는 사용하지 못한다)
bean 엘리먼트 생성
<bean class="xyz.itwill04.bean.ScopeBean" id="singletonBean" lazy-init="true" scope="singleton"/>
<bean class="xyz.itwill04.bean.ScopeBean" id="prototypeBean" lazy-init="true" scope="prototype"/>
참조변수에 저장된 객체가 같은 것을 확인할 수 있다.
ScopeBean bean1=context.getBean("singletonBean", ScopeBean.class);
ScopeBean bean2=context.getBean("singletonBean", ScopeBean.class);
ScopeBean bean3=context.getBean("singletonBean", ScopeBean.class);

System.out.println("bean1 = "+bean1);
System.out.println("bean1 = "+bean2);
System.out.println("bean1 = "+bean3);
scope 속성값을 prototpye으로 하면 객체가 여러개 생성된다는 것을 확인할 수 있다.
ScopeBean bean4=context.getBean("prototypeBean", ScopeBean.class);
ScopeBean bean5=context.getBean("prototypeBean", ScopeBean.class);
ScopeBean bean6=context.getBean("prototypeBean", ScopeBean.class);

System.out.println("bean1 = "+bean4);
System.out.println("bean1 = "+bean5);
System.out.println("bean1 = "+bean6);
스프링빈을 Annotation을 이용해 정의해보자
[AnnotationBean] 클래스
package xyz.itwill04.bean;

public class AnnotationBean {
	public AnnotationBean() {
		System.out.println("### AnnotationBean 클래스의 기본 생성자 호출 ###");
	}

	public void display() {
		System.out.println("***  AnnotationBean 클래스의 display() 메소드 호출 ***");
	}
}
[04-3_beanAnnotation.xml]
<?xml version="1.0" encoding="UTF-8"?>
<beans xmlns="http://www.springframework.org/schema/beans"
	xmlns:xsi="http://www.w3.org/2001/XMLSchema-instance"
	xsi:schemaLocation="http://www.springframework.org/schema/beans http://www.springframework.org/schema/beans/spring-beans.xsd">

	<bean class="xyz.itwill04.bean.AnnotationBean" id="annotationBean"/>
</beans>
[AnnotationBeanApp]
package xyz.itwill04.bean;

import org.springframework.context.ApplicationContext;
import org.springframework.context.support.ClassPathXmlApplicationContext;

public class AnnotationBeanApp {
	public static void main(String[] args) {
		System.out.println("================ Spring Container 초기화 전 ================");
		ApplicationContext context=new ClassPathXmlApplicationContext("04-3_beanAnnotation.xml");
		System.out.println("================ Spring Container 초기화 후 ================");
		AnnotationBean bean=context.getBean("annotationBean", AnnotationBean.class);
		bean.display();
		System.out.println("============================================================");
		((ClassPathXmlApplicationContext)context).close();

	}
}
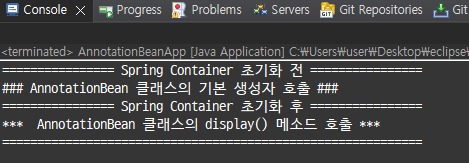
context namespace를 추가해준다.
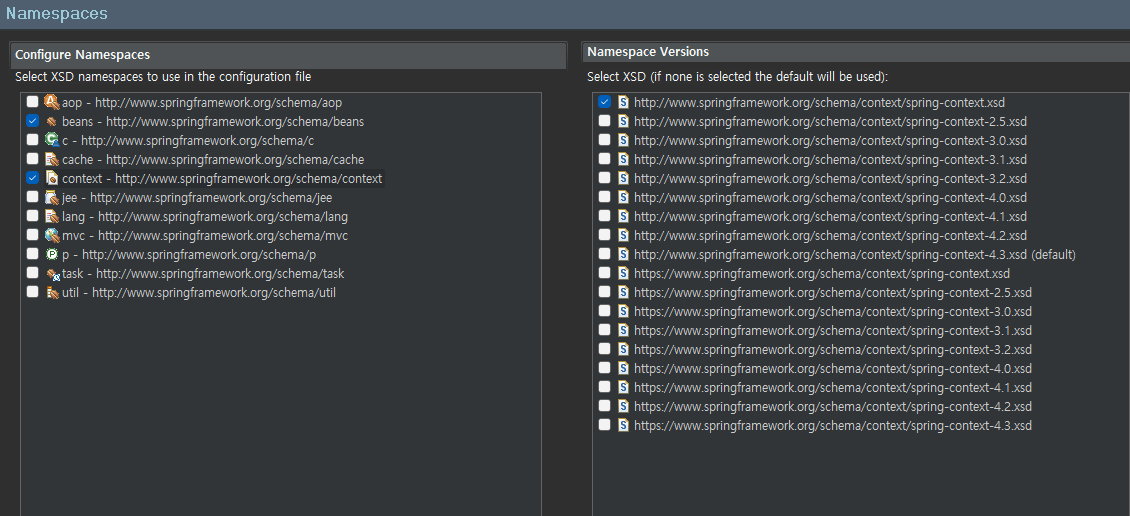
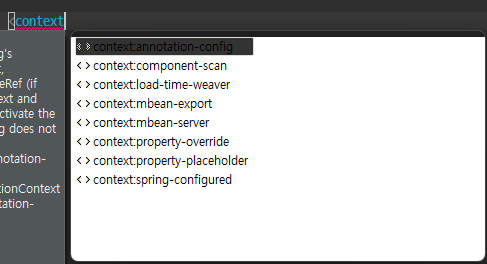
component-scan
: 스프링 어노테이션(Spring Annotation)을 스프링 컨테이너가 검색하여 처리할 수 있도록 설정해주는 어노테이션
→ context 네임스페이스의 spring-context.xsd 파일에 의해 제공되는 엘리먼트이다.
*스프링 어노테이션: 스프링 프레임워크에서 제공해주는 어노테이션
- base-package 속성 : 스프링 컨테이너가 어노테이션을 사용한 클래스를 검색하기 위한 패키지를 속성값으로 설정한다. - 상위 패키지를 설정하면 하위 패키지도 포함된다.
<context:component-scan base-package="xyz.itwill04.bean"/>
@Configuration
: 스프링 컨테이너에 의해 관리될 객체(Spring Bean)을 생성하여 반환하는 메소드가 선언된 클래스를 설정하기 위한 어노테이션
→ 클래스를 Spring Bean Configuration File과 유사한 기능을 제공할 수 있도록 설정하는 어노테이션이다.
@Bean
: 클래스로 객체(Spring Bean)를 생성하여 반환하는 메소드에 설정하는 어노테이션
→ @Bean 어노테이션을 사용한 메소드가 반환한 객체는 스프링 컨테이너에 의해 관리된다. 즉, Spring Bean이다.
→ Spring Bean Configuration File의 bean 엘리먼트와 유사한 기능을 제공한다.
→ 메소드의 이름이 Spring Bean의 식별자(beanName)으로 사용된다.
→ @Bean 어노테이션의 name 속성을 이용하여 식별자(beanName) 변경이 가능하다. ex) @Bean(name = "bean")
[AnnotationConfigurationBean]
package xyz.itwill04.bean;

import org.springframework.context.annotation.Bean;
import org.springframework.context.annotation.Configuration;

@Configuration
public class AnnotationConfigurationBean {
	@Bean
	public AnnotationBean annotationBean() {
		return new AnnotationBean();
	}
}
@Component
: 클래스를 스프링 컨테이너가 관리하는 객체(Spring Bean)로 등록하는 어노테이션
→ 클래스의 이름을 Spring Bean을 구분하는 식별자(beanName)로 사용한다. - 첫번째 문자는 소문자로 변환된다.
→ @Component 어노테이션을 value 속성을 사용하여 식별자(beanName)로 변경할 수 있다. ex) @Component(value = "") - value 속성만 존재할 경우 속성값 ....
[ComponentAnnotationBean]
package xyz.itwill04.bean;

import org.springframework.stereotype.Component;

@Component
public class ComponentAnnotationBean {
	public ComponentAnnotationBean() {
		System.out.println("### ComponentAnnotationBean 클래스의 기본 생성자 호출 ###");
	}

	public void display() {
		System.out.println("*** ComponentAnnotationBean 클래스의 display() 메소드 호출 ***");
	}
}
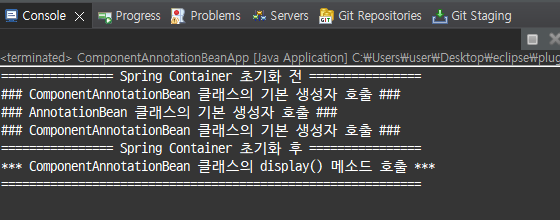
[ComponentAnnotationBeanApp]
package xyz.itwill04.bean;

import org.springframework.context.ApplicationContext;
import org.springframework.context.support.ClassPathXmlApplicationContext;

public class ComponentAnnotationBeanApp {
	public static void main(String[] args) {
		System.out.println("================ Spring Container 초기화 전 ================");
		ApplicationContext context=new ClassPathXmlApplicationContext("04-3_beanAnnotation.xml");
		System.out.println("================ Spring Container 초기화 후 ================");
		ComponentAnnotationBean bean=context.getBean("componentannotationBean", ComponentAnnotationBean.class);
		bean.display();
		System.out.println("============================================================");
		((ClassPathXmlApplicationContext)context).close();
	}
}
배포받은 클래스를 Spring Bean으로 등록하고 싶으면 XML(Spring) 이나 어노테이션(Spring Boot)로 등록하고,
개발자 본인이 만드는 클래스는 @Component를 사용하는 것이 편하다.
'학원 > 복기' 카테고리의 다른 글
| [Spring] Bean 컬렉션 주입 / autowire 속성 (0) | 2023.07.30 |
|---|---|
| [Spring] 의존성 주입(Dependency Injection) (0) | 2023.07.30 |
| [Spring] 제어의 역전(Inversion of Control, IoC) (0) | 2023.07.26 |
| [Spring] 로그 구현체 설정 (0) | 2023.07.26 |
| [Spring] 환경설정 (0) | 2023.07.24 |


